Thursday, July 31, 2008

Show Us Your Form! and Giftaway Reminder!

Hi, everyone! Let's start today's post with a couple reminders: 1) Friday is the SHOW US YOUR FORM party, hosted by Tiffany at ShabbyScraps.typepad.com.She sent an email to those of us participating to let us know that, so far, there are over 50 bloggers involved!!! Don't miss it! and
2) Today is the last day that you can qualify for this month's Giftaway. All you need to do is leave a message! Nope, you don't have to have a blog, you just need to comment! Be sure to check back tomorrow for the winner's name. It could be YOU (if you leave a message)!
This is one of those "wouldabeen" pictures. It "wouldabeen" funny if this rider hadn't dumped his cigarette before he pulled up next to us, so you'll have to imagine the circumstances. Biker riding in the pouring rain, smoking a cigarette. Now that's a dedicated smoker.
Time to show you a few things I've been up to in the last couple days: This is another one you'll need your internal visual imagery skills for (my blog, my descriptive phrases, LOL). Imagine this director's chair frame, white but covered in dirt, spider webs and cocoons. Here it is now, as it sits on my stepson's front porch.
Please forgive the bad pictures on these projects: A wreath made up of a few flowers pulled from an old floral bouquet and discarded pieces from a child's teacup set ...and a "make-do" put together using an old bedspring, a dove saved from a broken centerpiece and more of those flowers from the same old floral bouquet.
I'm also in the process of listing a couple of my aprons (old and new) and some of my extra wide eyelet trim on Etsy today and tomorrow and hope you take a look when you get a chance.
And now I'm off for a doctor appointment! See ya tomorrow!!!!

Monday, July 21, 2008

This Month's Giftaway, Passing an Award and a New Stove!

Okay, it's time for the July Giftaway prize packet reveal! (Where's the Vincent Price music, needed to make this announcement sound even a little dramatic?) BTW - for any "Newby" readers: To thank those of you who leave comments, I have a monthly Giftaway - drawn from the names of those who (ta-dah!) leave comments within that month. This month's package includes: this cute little vintage (?) apron (no, I didn't make it, this was an estate sale find!). Take a close look at this sweet thing - it's a four gore apron! I ask you, what woman of any decade would would take the time to stitch a four gore panel apron???? No, it's very obvious I didn't make this! Oops, sorry, I'm digressing still again. The package also includes this little resin bee and bee hive , , a handful of my scented handmade hang tags, a handmade bookmark and this altered tobacco tin that I made especially for the winner of this Giftaway. Anything else, you ask. Answer: Yes, but that's a surprise and will be sent with these items, not revealed until after the winner receives her/his package. It's also time to pass along the Furniture Whisperer Award I received from Margo. Who better deserving than Ki Nassauer? Congratulations, Ki, and thanks for all the inspiration you've given all of us! Remember my stove dilemna? (Remember when spellcheck didn't correct you for this spelling of dilemna????!!!!) Look what I finally got a few days ago! OMG, I LOVE it! No more cleaning those messy, awkward, goofy drip pans that were always beyond cleaning after one spill or over-boil, no more cooking on two (and then only one) burners. No more second-guessing how long it would take for my oven to over-bake. And look here: it's a convection oven, so it doesn't have one of those elements at the bottom that need to be carefully lifted and cleaned around! *Sigh*, I'm in cooking heaven. The only drawback that I see (so far) is that you're not supposed to can on these smooth top cooktops. Some say it's because of the weight of the pan and jars on the glass top, others say it's because of the amount of time the cook elements need to stay hot. Still others have told me that they use theirs for canning and have never had a problem. What does someone like myself, who does a TON of canning in the summertime do? Be thankful for our barbecue grill that happens to have a gas burner attached to the side. It does the trick and I'll happily trade the inconvenience of it for my new stove! (Still doing the happy dance!) And...my upholstery tutorial is basically finished. From the point I left you at last time, the only thing left on my particular chair is to trace the shape of the old cushion on a newspaper for a pattern (depending on the size, you may need to tape two pieces of newspaper together), buy a sturdy piece of foam large enough to accomodate your project, trim it off as needed (you may need to borrow an electric turkey carver - it's the easiest way to cut foam this large), cut and sew your cushion pattern, stuff it and you're done! Why haven't I posted a picture of my final chair? Uh...(clearing throat and blushing a little)...I keep forgetting to buy a piece of foam. Speaking of forgetting to post pictures (awkward segway, but it works), I forgot to post a pic of my newest flower potty. Here ya go: Before I go, I want to show you a picture of one of my gardening mistakes: Do you see what it is? These four o'clocks and gladioli are the same exact color. I love gladiolas/gladioli (whatever) and happened to grab a hand full of bulbs (color unknown at the time) and couldn't believe the coincidence. I keep telling myself that I will replant them in the fall, but they've been like this for eight years now. Before YOU go, be sure to leave a comment!

Saturday, July 19, 2008

A NEW Award and New Projects

Uh-oh, I've been a baa-ad blogger this week! Bad Sher! Bad Blogger, Bad! It's just that I've been so busy (don't 'cha just hate that whine??? I mean, we're ALL busy!)... okay, no excuses. I'll skip that part and go to the good stuff! First of all, I need to thank Margo for my new award, the "Furniture Whisperer Award".
I think I know who I'll pass it on to, but I'll do that in my next post. I appreciate you thinking of me, it's a terrific honor to receive it from YOU!!!! If, by some whim, you don't know Margo be sure to hop over to her blog and check out all the fantastic things she does with the items she finds while curb shopping. Meanwhile, Hubby found this curbside treasure: Cute, isn't it? (Gagging reflexes...) Of course, it had to have a little minor surgery. You know, cleaned up, leg repaired, fresh paint and a new seat attached. Here's what it looks like now: I love this upholstery fabric. It reminds me of a favorite scrapbook paper. Christmas has been on my mind for the past month. No, it's not too soon to start thinking about it. After all, it's closer to us than this past New Years is. I mean, next month is August, for Pete's sake. And next week is my birthday. I've decided that it will be the last birthday that I claim. In fact, I may start counting backwards. Either that, or move my birth year forward by - let's say - 10 or 15 years. Hmm. If I do that, I can still have 15 more birthdays. I'll have to think on that one. But there I go, digressing again! The reason I even brought this up was to let you know that, in celebration of my birthday month, the July Giftaway will be another Big Giftaway. I really have been working on the package (you already know that I'm including one of my decorated tins) and should be ready to download a photo on my next post. You're gonna LOVE this one! And all you have to do to enter the Giftaway is leave a comment. Sooo easy! Okay, back to Christmas. Those of us who sell in shops (online or otherwise), shows, etc. have to work at least two months ahead of the season. Yes, we do have Halloween and Thanksgiving before Christmas but the fact is, Christmas generates the most sales and we have to be ready for it. This is my warning to expect to see even more red here than in the past few weeks. But, just to let you know I haven't completely skipped over Autumn, here's a couple things I've done with those old tobacco tins hanging around my studio: (this next one is hanging from an old coffee cup peg rack) Until tomorrow... Hugs,mysig Sher

Friday, July 11, 2008

More Tobacco Can re-dos, Giftaway Reminder

It's been a while since I've had anything for sale on Ebay; I put a couple Kirk Stieff chalices on a few days ago and the auction ends within 24 hours. Click here if you want to take a look.

I am having so much fun dressing up my old tobacco tins! Hubby is having a minor panic attack, asking me (for about the fifth time, last night): "Aren't these worth about $5 or $6 each?" "Only if people buy them," I reply as I sort through my ribbons and beads, getting them ready for yet another can. (I've had some sitting in our shop for over a year.) The pictures I posted of the ones I did the other day turned out so lousy that I took them outside so you can get a better look: These are so much fun! I've decided that one will be included in this month's Giftaway! I think I'll toss in another apron, too. Stay tuned for a peek at the complete Giftaway package! But don't leave without leaving a comment - that's how you get qualified, you know! Here's a shot of a little trinket "prayer box" I just finished. I love the look of beads with the flowers. Don't forget: Leave a comment and you will be automatically entered for this month's Giftaway!!

Thursday, July 10, 2008

Chair Upholstering Tutorial, Continued

Finally! We're ready to continue our upholstering tutorial! I hope you have all the "before" pictures handy, along with the ones you took during the deconstruction process. You'll also need: Fabric that you chose for this task, scissors, hammer, tacks and/or heavy-duty stapler (not the kind you have in your office) and staples, a roomy workspace and a good attitude. Remember, this is not a good time to have toddlers around; you may still come across staples and nails that you previously missed and you know how little ones like to put absolutely everything in their mouths. Plus, this is generally where the cursing begins and of course, they shouldn't be around for that. The chair I am working on here requires padding beneath the seat cushion and on the chair back itself. I have chosen to cover a seat cushion in a contrasting fabric; therefore, today's photos will be only of the backs (both sides of the back) of the chair and the bottom area upon which the cushion will rest. In other words, the cushion itself will be the next (as well as the last!) part of this tutorial. At this point, the chair has been completely stripped of all its old fabric and stuffing materiels (spelled correctly, check Webster's) and the frame has been cleaned, sanded smooth and painted or otherwise prepared. Since my chair required some padding, I cut batting and used some leftover quilting fabric to hold it in place. I will be stapling my upholstery fabric over what is shown in this picture. Although the batting and fabric used to secure the batting in place will be covered, neatness is still a factor. If this step has lumps, so will your final step. Think of it as making a bed without straightening your top sheet. I like to start with the seat area. Lay your batting, fabric, etc. on the area you are covering and smooth with your hand. You're ready to trim away excess fabric. Make sure you cut your batting and subsequent covering fabric long and wide enough to fold a hem. This will help increase the strength of the fabric and help prevent fraying and tearing with normal use. Pull the fabric as tightly as you can, stapling it on one side and then the opposite. KEEP IN MIND that all chairs do not require this step. If you didn't remove batting, etc. during the deconstruction process, you don't need to add it now (unless you just want to). Once the seat area (not including the cushion) is finished, turn your attention to the back of the chair. This one required padding on the back. I chose to not cut a foam cushion for the back and opted to instead stuff it with foam pieces (available at WalMart and most fabric shops). I did this by stapling my under-fabric to the back, leaving the top open for stuffing. Make sure there are no lumps or uneven stuffed areas before you staple your opening closed. It's now time to apply your final upholstery fabric to the bottom of the chair. (I hope you're continually examining your "before" pix) In the same way you applied the batting, smooth your fabric over the seat area. Again, you want to make sure you have fabric enough to turn the edges under for a hem. This will probably require a lot of positioning, stretching of the fabric (make sure it's nice and taut) and grumbling on your part. Turn the ends under as you would if you were making a bed with "hospital corners". Don't get frustrated. Take a break if needed. You can do this. This is probably the first chair you have completely stripped down and upholstered; forgive yourself for any "mess-ups". Chances are, there is a way to fix it or hide it. Send me hate mail. Just don't hurt the kids or yourself. Now that's out of the way, let's do the same thing to the back. Cover the front of the back first. That is the side that your back will rest against when sitting in the chair. Expect the back to not be perfectly square or rectangular. You may have more fabric left over at the bottom than at the top. That's okay, it's to be expected. Just try to not trim it too short. If you're going to sew buttons to the back for decorative reasons, do it now before you put the true back part (the part that will probably face the wall) of the fabric on. You'll need a long needle; I use a 3" doll needle. Don't try to do this with a regular sewing needle or embroidery needle, as it needs to be long enough to penetrate the fabric and all the stuffing you used. Pull your needle and thread all the way to the back and fasten securely before you go on to your second, third, etc. buttons. (I use a piece of chalk to mark the areas where my buttons will be; it's much easier to measure and mark before you start sewing on the buttons.) The following three pictures show the process of securing the true backside of your chair back. Start securing the fabric at the top of the chair, being sure to fold in your hem as shown. Position the fabric on top of the staples or nails you used to secure the front side of your chair back. If you are using decorative upholstery tacks, this is an area where you will want to utilize them. However, I suggest that you hammer them in only far enough to hold your fabric in place. You will probably end up removing and repositioning both the tacks and the fabric. The fabric will require some "easing" and gentle pulling here and there. Tacking the top in place and allowing the fabric to hang loose allows me a better visual of which areas (if any) need to be trimmed. Too much bulk will end up in a lumpy back. Once you have your back in place, you're almost finished! You now have only the cushion to go! But that's enough for today - the final installment of this tutorial will be posted in the next couple of days. For now, take a deep breath and maybe a few swigs of wine.

Sunday, July 6, 2008

Garden Chair Tutorial and a Trash to Treasure for flat shaped cans!

"It's raining, it's pouring, the Old Man is Snoring..." we're currently under a severe weather watch here, but I'm not too sure why. It was really raining hard earlier, with lightening, big thunder-boomers and hail but right now it's pretty calm outside. Most of the day turned out to be pretty nice, though, and I was able to put together another plant/garden chair and work on a few other things. Here's the old ladderback chair I started with: My hubby rescued it from curbside trash one day and brought it home to me. Yes, I do know he's a Keeper. ;-) The wood was really, really dry so I primed it to prevent the wood from drinking the "real" paint. I used Krylon's Cherry Red gloss spray paint for the final color. The color was pretty true to what it was supposed to be, but it took most of the can to cover the white primer. (Will you be as glad as my hubby when I kick this red stage I'm in???) The second coat didn't bubble and I have to admit that impressed me. Next, I stapled a piece of burlap to the seat area to hold the flower pot. You'll want to cut a piece larger and longer than the seat area so you can turn the ends under a couple times (like you would if hemming a skirt). This helps prevent it from tearing and raveling; if you've ever worked with burlap, you know it's one of the most ravel-ly fabrics out there. If that's not a word, it is now. Ravelly. There, it's been typed twice so it's now official. (New rule from the Sherster Dictionary) The reason for the longer cut? This gives you extra fabric to fold over to make a single pleat on each side. The pleats will make a little "pocket" for you to better position your pot. I decided to hot glue bits of moss around the side to cover the staples. You could use buttons, glass pebbles, etc. if you want. It all works well. I mixed some raffia in with the moss and placed it around a pot in which I planted Lily of the Valley. This particular chair was made for a covered porch. It's important to decide where the chair is going to be before you add a plant. Plants like Lily of the Valley and Hosta will fry in the sun. Final touches - I decided to add a little birdhouse and bird to the back of the chair, stuck a couple silk blooms in with the greenery and this is the result: I've made several of these and love, love them! The white one I made last year to put under our Dogwood tree sat outside all winter long and still looks great, hosta and all. I peeked at the one I gave my neighbor and it, too, stood up through the weather.
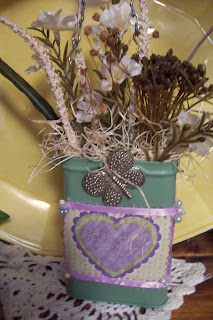
The following idea is one that was inspired by a particular post on Heather Bullard's Present Past Collection blog. (What a great blog, by the way! If you haven't already visited it, give yourself a treat and visit!) I have a bunch of old tobacco tins. When I say a bunch, I mean a bunch. See what I mean? Anyway, I ended up painting a couple of mine, punched a hole in each side to run a ribbon through (and fastened it by threading the ribbon through a button and knotting it), adding a little something-something to decorate the front and -- well, here, look for yourself.
These pictures are horrible, by the way. The end result is really cute. You can hang these over a doorknob, drawer knob, coat rack peg - you get the idea. They'd look really cute over a garden gate, too, wouldn't they? And now I'm thinking that you can decorate the can but leave the flowers out of the opening. Instead, insert some recipe cards or note cards and a pen. They'd come in handy hanging from your fridge for those instances where you can never find paper for a quick note ~ or ~ placed on your front porch door so unexpected visitors can leave you a greeting when you're out. Thanks for the idea, Heather! Don't forget to leave a comment to be eligible for my July Giftaway! And I promise to finish the upholstery tutorial this week!

Friday, July 4, 2008

Happy Birthday, USA!

May you all have a peace-filled and wonderful day to celebrate with your friends and family!

Thursday, July 3, 2008

Tutorial Delay, An Apology and Shabby Chic

Here I go, apologizing again. I know I told you that I would continue the tutorial on upholstering in today's post (okay, in yesterday's post, but I didn't post yesterday) and life once again got in the way. I will continue and finish the tutorial. That's a promise. And I'll try to do it within the next few days. Meanwhile, if you've started an upholstering project in hopes of finishing it as I finish up my chair, email me (Miller.sher@yahoo.com) and I'll try to help you through it. True to my normal style, I have been running 'way behind on absolutely everything. This house is a mess. I walked into the kitchen this morning and it looked like my kitchen had literally thrown up all over itself. Stuff was piled everywhere. On the counters, on the table, on the chairs. I knew a trip to the shop was inevitable as I began pricing items and packing them into the van for the trip. The kitchen is still far from sparkling clean but at least it's functional once again. Our back patio was the area that needed attention yesterday. We have white outdoor metal swivel chairs that had started to rust. Letting them rust away is not an option for me, so out comes the sandpaper and the spray paint once again. Of course, while I was out there working, I noticed a tiny baby chickadee watching me from its little "doorway". While I was working on the chairs and noticing baby birds, I noticed this old wooden worktable was looking pretty shabby. (Note that I remembered to take the "before" pic after I started painting it.) A girlfriend of mine gave it to me several years ago when she caught her worthless, good-for-nothing, lazy boyfriend doing drugs and tossed him out on his ear. (I had told her for months that she threw out everything else in her home that didn't work, and that he shouldn't be an exception.) As a result, we became the new owners of this little worktable. Anyway (see how I get off on these tangents?), I turned this valueless, plain little worktable into a valueless, red little worktable. Yes, I am deeply embedded in my "red" stage. Be glad you didn't know me when I was going through my "Madonna" stage.
And while I'm off the subject, I might as well drift off a little further and show you this picture of a rainbow I snapped on the way home from Indiana:
...Back to the stuff in my kitchen and being shop bound: Before I left, I remembered to snap a few pictures of the booths in the first floor of the shop (being the Corner Nest in Elizabethton, Tennessee) and have posted a slide show for you to enjoy. (Trash to Treasure friends, you'll want to pay particular attention to the last few shots. You'll see a lot of old bicycle wheels and metal pieces, bent to look like ribbons and all sorts of cool things!)